Pages

Friday, July 13, 2012

Boiled Peanuts

Its summer time, and there's nothing better than boiled peanuts!

Typically, I've always made boiled peanuts by well, boiling them in a pot. But that takes a while and I have a gas stove, so the idea of leaving an open flame for an extended period of time makes me a little nervous. So I pulled out the crock pot!!

Using:
2lbs of green peanuts
1 cup of salt
12 quarts of water

I put all ingredients in the crock pot, cover and cook on high for 18 hours. 
Drain and serve! 
 mmmmmm....

Refrigerate in ziplock bags for up to 2 weeks, or freeze for up to 2 months. Reheat in microwave before serving.

Wednesday, June 27, 2012

Drawstring Laundry Bag

So my sister and her boyfriend just graduated high school, so for her graduation present she asked for a drawstring laundry bag. So I went hunting for cute ideas an found this great tutorial and made these adorable bags!!
 This tutorial made for a shorter bag than I was looking for. It called for about 2/3 yard of each fabric. I added the last 1/3 (because I bought a yard of each) onto the end of the bag to make it longer.
I did NOT do the monogramming... while I wish I could get the equipment to do it, I want a serger first! (If you looking for a great monogrammer in Charleston, contact me! She's amazing!)


Helpful tip:

Since the front and the back of the top seam were different colors, 
I put the pink thread in the bobbin and the blue thread on top of the machine. 
This way my thread matched the color of the fabric!
 Also, I finally got a label made! I hated not being able to put my name in my creations, so I found a label on namemaker.com that I liked and here is what I got...

Sunday, June 24, 2012

Pillowcase Dress with Ruffles

I love my pillowcase dresses! Its so much fun making them but I needed a challenge recently so I decided to try my hand at ruffling. Plus I had it in my head that this dress would be perfect with a ruffle.  I found a pattern for a ruffled bottom pillowcase dress and a to help get me started. I used my previous pattern for the dress, but I added an inner lining to cover the ruffle seam. Well I don't have a gathering foot or a ruffling foot ( I will one day but the sewing shop was out and I wanted to do it then and not wait to order one) so I decided to try ruffling by hand.  I went to google and looked up ruffling and a ruffling tutorial and some youtube videos and watched them until I felt like I understood. It took waaaay longer than it would have it I had the right foot, but it was fun to learn how to do it without one.

I started by cutting 5 strips each 3" wide x 22" long.
 I set my machine at the longest stitch and went across twice, leaving some thread at the ends. Hold the thread at the end and slowly ruffle the fabric between stitches until all done. My ends frayed so I ran a zig zag stitch over the end
 Then I attached all the pieces together and made one long ruffle.
I put the ruffle between the inner and outer lining of the pre-cut fabric (right sides facing) and sewed them all together and flipped so I could start putting the dress together.

 I also attempted fabric ties this time instead of ribbon, to match the ruffle.... Oh I loved it!
 Here was my final product.... Perfect little July 4th dresses!

Also, I've found this amazing sewing shop called Five Eighth Seams. They do sewing classes, they sell beautiful fabric, and the staff is just wonderful. Well I'm in love with their fabric! And they are so helpful that you just can't resist going to the store, not just for fabric but for great tips.

Well I was hunting for a pattern for another pillowcase dress I was making and I found some beautiful fabric that I just had to use. While I was in there they gave me a great idea!  Instead of just a 2 toned dress, which was what I was planning on, do a 3 toned dress!

All I did was add a small strip of fabric between the 2 sections and sealed.  The strip was 6" cut and folded in half and placed between the bottom and top piece, I used a 1/2" seam allowance. I could have use a 1/4" but it was my first time doing it.
And it was just too beautiful to not make a headband to go with it!

Friday, April 6, 2012

I made a tutu!

It was my best friend's little girl's birthday a little while ago and I am late getting her present made...but i finally finished it!! I wanted to make a her tutu, so I found a couple tutorials for making them on Pinterest. It was actually incredibly easy! Which is awesome because I have so many little girls in my life to make presents for!

For the basic design, I used the tutorial on A Small Snippet's blog.
I did a few things different:
1. I wanted it longer so I made my cardboard 7"x 18"
2. My fabric store didn't sell the rolls of tulle (which I want to try next time), instead I bought 3 yards of each color (6 yards altogether). Then folded, wrapped, and cut to make the strips needed.
Tip: This pictures looks loose, but it actually needs to have no spaces or gaps between tulle. You don't want to see the elastic.

Then I added some flair using a skinny ribbon between every 2 slip knots from Twigs and Toadstool's blog.
Finally, I wrapped a satin ribbon around the top using the tutorial on Treasures for Tots
And I used Chatelaine's tutorial for tying the perfect bow! It was for tying on a box but I improvised.


This is my finished product! I am so excited!! :)
Front
Back

Monday, March 5, 2012

Alphabet Sugar Cookies

So it is that time again, where I have to bring snack to Jackson's class for a week! Now being the overachiever that I am, of course this can't be easy!

After some talking with Jackson and searching on Pinterest, I finally found my idea for Monday's snack!  Alphabet Cookies! Well the pin didn't have a link to a website, so I found another cookie pin and on it was a recipe for homemade Sugar Cookies (now let me just say the lady that does that blog has some of the most beautiful cookie creations!!! I can't wait until I have a chance to try out her tutorial for the Lego Man cookies)  Well, it was Sunday night and I was not set up for any crazy project. I had on hand what I needed to make just the sugar cookies with sprinkles, and of course my alphabet cookie cutters!

 Well, after making the cookies, we rolled out the dough and got straight to cutting letters!
 Here's where it got interesting.. I knew I wanted to bake the cookies with the sprinkles already on it but I wasn't sure how to go about it, so I started by lightly dipping the cookies in the sprinkles on a plate. It definetly got maximum sprinkles on the cookies but it was a pain because the cookie dough was so flimsy and the letters kept wanting to fall apart.
 Next, I tried sprinkling the sprinkles on top of the rolled out dough, rolling them into it with the rolling pin and then cutting the letters out. By the end, the sprinkles weren't just on top of the cookies they were in the middle too which was fun. Plus, I only had to move them once from the paper to the pan! I definitely liked this way the best!
Quick Tip: Her recipe calls for 7-8 mins at 400 degrees... Well I used tiny cutter and her cookies are bigger, so these only had to cook for about 5-6 min, while that may not seem like a big difference, that extra minute or 2 burnt a whole batch of cookies!
One More Tip: Rub a little bit of shortening to cover the cookie pan and sift a little flour on top and your cookies will come off easy every time!

Cooling racks are such a great baking tool!
mmmm... tastiest Alphabet ever!
I think my favorite part of all of this was how much Jackson got into it! He was so excited he kept telling me I need to make a the first letter of everyone in his class's name, but the problem was he could only remember 5 names and there is 17 kids in the class! So I did may best... :)  And tomorrow at snack time he will be so happy to eat and share the cookies he helped me make.

Creative block... well sort of...

So lately I've been juggling a lot! More so than I'm use to it feels like.  I've felt kind of stuck in a rut... unable to get my creative juices flowing. But as it turns out they just need a redirection.  I've been struggling with organization lately.  I feel like I have too much stuff and not enough space. And it wasn't always like this, I think it got worse after Christmas. Which I guess is understandable.  But now I'm needing to begin my spring cleaning. I am on a mission to declutter my house and get rid of stuff that I don't need or at least store it properly until I do need it. And also to rearrange a bit and add some more color. I was called out the other day because I haven't really ever took the time to "decorate". Yeah, I have a few curtains and some pretty candle pieces out but not really enough to make the place interesting and I feel like I need a little more interesting while looking around my house. So I started by getting a tablecloth for dinner table! Its amazing how a little bit of color can brighten a whole room. And I cleaned my oven (there's nothing quite like a clean oven!). Next, my goal is to rearrange and organize my kitchen cabinets for better functionality, and clean out anything that doesn't need to be there.

So while still juggling my 2 kids, my sister's baby that hangs out with me a couple days a week, Jackson's first year of school, my husband recovery from ACL surgery, all our activities, all the projects I so want to do and now decluttering my stuff, I've got a lot going on but it will be so worth it in the end.

But if it takes a while in between posts, this is why! I will be posting though.. because I'm in the middle of another pillowcase dress project which of course I will want to share once I've finished and I have more curtains to make, I'm still always experimenting with food. So I will be still be here as best I can be. But just know I'm working hard now so that I will have more time to get creative later... but whoever said spring cleaning can't be creative! :)

Friday, February 17, 2012

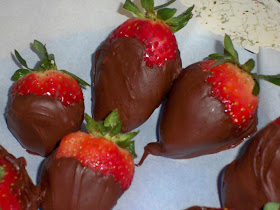
Truffles & Chocolate Strawberries

I'm not a huge fan of Valentine's Day. Its not one of those major holidays I like to run out and spend tons of money on (I really only do that for Christmas, maybe sometimes Easter).  Plus its before my anniversary and birthday, so I really don't like to spend money for it (because were saving it up for our trip!)  But my husband has been talking about truffles for months now (kind of hinting, kind of dreaming) So I decided if I was going to do one thing for him it would be to make him some truffles and his favorite dinner. We had Chicken Parmesan for dinner, and I found a recipe for Basic Chocolate Truffles on one of my sorority sister's blog (Click the link for the recipe).
Topped with Pink Sprinkles, Cocoa Powder, Pecans, and Plain
These were a project but were a huge hit! Everyone who has eaten on has loved it (except me because I'm not really a truffle person, I just made them for him)


But for me, I made some quick and easy (well sort of) Chocolate Covered Strawberries. I love them but I only ever make them a couple times a year for special occasions.

List of Items needed:
6 oz of semi sweet chocolate chips
15 strawberries
Parchment paper (this makes all the difference because they just peel right off and you can throw the paper away, no big mess!)

Simply wash and dry the strawberries (make sure they are dry because the chocolate won't stick well if its wet)
Heat the chocolate in a microwave safe bowl according to the instructions on the bag. Tip: Make sure you actually decrease the heat setting on the microwave as instructed because if not it could be a mess)
Next, dip the strawberries in the chocolate and lay on the parchment paper to dry.
 And then sit and enjoy, your amazing snack!

And I hate to be one of those people that posts their Vday flowers but can I just say that I have been married 5 years and this is the 3rd ever bunch of roses I have ever gotten (even before him) AND he got my favorite color!  My honey won brownie points, especially since that Tuesday was one of the longest most frustrating days I've had in a long time!


Thursday, February 16, 2012

Another Pillowcase dress

I just made this one for a friend with a little girl named Lily on the way.  I made the dress and my mom knows someone who does monogramming so I had her do the letter (if you need someone to do monogramming in the Charleston, SC area, let me know I will give you her contact info!)... one day I hope to own the equipment to monogram for myself!  It was just so cute I had to share.  To check out my other pillowcase dresses click here and here.

Also, I made her another burp cloth :)

Sunday, February 12, 2012

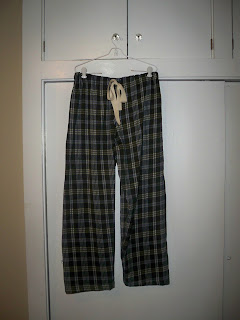
Pajama Pants update

So back a while ago I posted about making some Pajama pants but I never finished the second pair or got any adorable pictures of my children in them so I figured I would do an update of adorableness!
 
I loved them, they loved them, I can't wait to make more!  
I think this summer I'm going to try seersucker pants!


The pajama pants below were made from the Simplicity pattern 2290, I liked it because it had adult and child sizes, so that I can use it for a bunch of different sizes. I made these for my sisters and brother in law for Christmas! My husband was very upset I didn't make him any, so that is now on my long list of projects I want to do! He will probably get bumped to the top right after I finish the boys' last 2 bedroom curtains... I'm having motivation issues.


Friday, January 20, 2012

My Couponing Success Today!

I am not an extreme couponer! I don't know if I have the energy for all that but I do keep a coupon notebook, I do clip them and I do use them when its on something that I buy, as I've said before

Well, I got a hold of a ton of store and manufacturer's coupons for household products/diapers. And I'm really excited about it so I wanted to share my success today!

Publix had Huggies Supreme & Slip-ons, Pull ups and Goodnights for $19.99. In their store flier this week, they have a $2 off any of those coupon.  And either last sunday or the sunday before, the newspaper had a Publix coupon flier with a Huggies slip-on coupon for $3, and well as Huggies Slip-on, Pull Ups, and Goodnight manufacturer's coupons ($2 off each).
  • So I got Huggies Slip-ons for $15
  • I got Pull Ups for $16 .
I checked out Target and Walmart and they were $19.97 and I couldn't have used my publix coupons there so I got a deal!

Oh and Huggies wipes were "on sale" also at publix for $5.99 (on sale at publix is the same price at walmart) but I had a store coupon worth $1.50 and a manufacturer's coupon for $.50, and since Publix is awesome, they double coupons up to $1.
  • I got a bag of Huggies wipes for about $3.50.

Next, was Kleenex. They were on sale 4 boxes for $5. So basically $1.25 a piece. I had 2 store coupons for $1 off 2 boxes and a manufacturer's coupon for $.50, so $1 after doubled.
  • I got 4 boxes of Kleenex for $2, which is $.50 a piece! 
That was a lifesaver because everyone in my house has a runny nose!
Then came Colgate Advanced Total.... it was on sale for $2.39 a bottle. I had a store coupon for $1.50 off 2 and a manufacturer's coupon for $.75 off 1.
  • I got Colgate toothpaste for $1.27 a piece!

And finally, I needed some shaving cream and Edge was buy 1 get 1 free, I did have a $.55 coupon but when I pulled it out it was expired... sad. But I still got it for $1.22, which is better than $2.45!

And to top it off, for buying $35 (before coupons) in participating Kimberly Clark products, I was able to send in a rebate to get a $10 gift card to Publix!!

So needless to say, today was a good day for sales and I am very happy with all my goodies! :)

Angry Bird Can Toss

I found this idea on Pinterest, and as much as my kids love the Angry Birds game and are in need of outside activities, I figured I would make it for them. I had originally wanted to make it for Christmas but I didn't complete them in time.

Using the tutorial here, I saved up my cans and went hunting for a red dodgeball. Can I just say how ridiculous it was to find an inexpensive red dodgeball!  I ended up finding one on sale for cyber monday at ToysRus.com.

I googled the angry bird faces and cut and cropped them in the paint program until I got the size I wanted. 

Next the cans, in the tutorial, she spray painted them and then painted them. I tried to just paint them first not realizing what I was doing.  If I had to do it over again, I would either prime the metal or sand it before I painted it because after the first use the paint was already scratching off.
Then using my printed face cutouts, I stenciled the faces on to the ball and cans and painted.


These were a lot of fun to make but I think the enjoyment my kids have gotten out of them make it even more fun!