Friday, December 30, 2011

Beer Butt Chicken

My bestest friend made Beer Butt Chicken for me one time while I was visiting her, it was the juiciest, tastiest chicken ever!

So of course I asked her for the recipe, not realizing I had to violate a chicken to make it.  This may have been the most awkward chicken making ever!  But it was worth it because it tasted awesome!

Check out the recipe here: Beer Butt Chicken

That poor chicken
Oil and Seasoning
Well Cooked Bird
mmmm.... tasty!
I just think this is wrong and funny at the same time.


Hot/Cold Compress

So again with the Pinterest craft ideas, I found an awesome heating pad that doubles as a cold compress that made for an easy sew and a great Christmas present.  And now that everyone has received there presents I am able to post this.

I found a tutorial here that was very helpful!  All you need is some fabric, lentil beans, lavender (which I found at Earth Fare), a sewing machine, and a few hours to work (or less if your really good!) 
Lavender and Lentil Beans
(2) 6 x 18in pieces - I may make it a little wider next time...
Bag sewn shut with only the end opened
After putting 2lbs of beans and 2 tbsp of Lavender, Close the bag
I had some issues with the pouches and breaking the needle on the beans, so be careful! The tutorial above has the best method of sewing the pouches.
Now you have a great compress, Heat for 3 minutes in the Microwave or Put in the freezer and enjoy!

Tuesday, December 27, 2011

Gingerbread House

So Jackson came home from school one day talking about the gingerbread man story and having had gingerbread also that day, was very excited about it.  Well that sparked an idea! I had only ever made prepackaged gingerbread houses before and was in the mood to try my hand at made from scratch gingerbread!

So I googled it and found a pretty basic recipe, house tutorial, and stencil all in one place on Simply Recipes and the Royal Icing recipe, I found on Wilton.com
Mixing of the Gingerbread, click the link above for the recipe!
After Kneaded, Wrap in plastic wrap and refridgerate for 2 hours - 3 days
Remove chilled dough from fridge
Lightly flour and roll out to 1/4 inch thickness
Cut Pieces (using patterns from recipe) and bake at 350 degrees, 11-15 min for large pieces & 6-8 for small
Cool completely for 15 min
Make Royal Icing from recipe, I set a little extra aside and put some icing colors in it.
Start Building!!
Secure with lots of icing
Attaching the roof

decorate as desired!


I made people with the leftover gingerbread for the kids to eat!


This house was a blast to make but it took me a few days because I had to let the icing harden and I could only work on it at night because the boys bugged me to eat it constantly!

Card Table Playhouse

So this Christmas, we were on a budget so I decided to make most of our gifts. Plus I have this wonderful sewing machine and tons of ideas!

When I was a kid, my grandmother made each of us a card table playhouse. Hers were so elaborate! The had our names on them with gorgeous windows and flowers. I so wish I could find the picture of it, hopefully one day I will. But I decided my kids' should have one as well.
So I found a tutorialette here and I bought some dark green and camo felt  while it was on sale at Hancock Fabrics during the Christmas sales, pulled out my sewing machine and got to work!
Side view
The Front Door
I used ribbons for the tie ups
The windows are on both sides
Happy kid in his new playhouse!!


Tuesday, December 13, 2011

Butterfly Snack

 
Here's another Pinterest favorite that I made for snack today, its definitely more practical for a bunch of elementary school kids but still just as fun!  I couldn't find a link to who came up with it, so to whoever did make this, you are awesome!!
I used green, white and black craft paint to make these and then just let them dry overnight
The one on Pinterest used googly eyes but I didn't have them so I improvised
This is just a snack bag filled with Goldfish and grapes. I didn't over fill because you still need space in the middle to twist.

Pipe cleaner turned into antennas
Just twist, clip and Voila! Butterfly Snacks!

Melted Snowmen

So I realized today that I have a whole lot of pictures saved to my camera and not a lot of blog posts.  So hopefully, time permitting, I can get posted some of my newest creations!
Well, this week is my snack week for Jackson's class. And it has given me an opportunity to make some things that I probably wouldn't have made had I not had a classroom full of children to give snacks to!  So Thank you Pinterest again for some AMAZING ideas!!

I found a great idea for Melted Snowmen or Snowmen S'mores here via Pinterest. And lucky me, I just happened to have all the ingredients in my house!
Graham Cracker Squares and Hersey Chocolate Bars
Melted White Chocolate
I just used a normal spoonful and that was PLENTY! Be careful not to put too much it will get messy
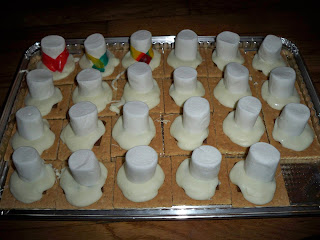
Place the marshmellow on top while its still warm and it will harden into the chocolate
I trimmed a fruit roll up to make the scarf
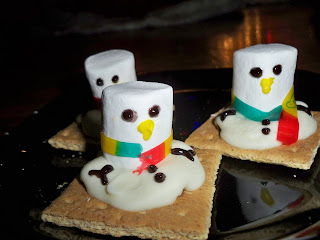
I used just tube black and yellow (it was the only color I had) icing to decorate
Army of Melting Marshmellow Men!!

Saturday, November 12, 2011

Sticky Bun Ring

A friend introduced me to Pinterest and I have fallen in love! I have found some great recipes and craft ideas that I am super excited about making!

On there I found a recipe for a Sticky Bun Breakfast Ring and made it this morning! It only took 25-30 minutes to make and it was amazing!!

Her recipe called for 2 small tubes refrigerator buttermilk biscuits OR 1 tube Pillsbury Grands buttermilk biscuits. I found 1 tube of Jr. Grands Buttermilk Biscuits and that's whats pictured below and it was just enough for the 4 of us with a couple leftover.

Makes a crispy bottom, once flipped

After flipped, MMMMMM....

Friday, November 11, 2011

Here comes Barbie...

Growing up in a family of 4 girls, Barbies were plenty but accessories were scarce.  I personally had Barbies but didn't play with them as much, I more liked to experiment with their hair (including scissors and dye). Well now that I'm a big girl and have 2 little boys, Barbies aren't really around at all. But my youngest sister has always loved Barbies and requested a Barbie Cake for her 18th Birthday!  This gave me an excuse to do my 2 favorite things: Bake/Decorate a cake and experiment with Barbie!

So I googled Barbie Cake recipes and found one on Allrecipes.com, Barbie Doll Cake Recipe, That seemed fairly simple to make. But cakes tend to have a mind of their own so I had to modify a bit.

Ingredients

  • 2 packages cake mix
  • 2 -3 packages vanilla frosting
  • Icing Color

Directions

  1. Preheat oven to 350 degrees F (175 degrees C). Grease a 2-quart ovenproof Pyrex glass mixing bowl & 8 inch (or 9 in) Square Pan with shortening and dust with flour.
  2. Prepare cake packages separately as directed on box. Pour 1st box into prepared bowl and 2nd in square pan.
  3. Bake Square pan as directed on package and Pyrex bowl for 60 - 90 minutes or until cake tester inserted into center comes out clean. Cool 15 minutes. 
  4. Trim top of cake to make flat (to prevent cracking when flipped)
  5. Place cakes seperately on cooling racks to cool 3 hours before decorating.
  6. Put square cake on bottom, add icing to layer, then place round cake on top of square cake (widest side down)
  7. Insert a clean doll into center of cake (I had to remove the legs, she was just too tall - the pop off pretty easy) and secure her with the icing. 
  8. Decorate the skirt with icing tinted any color or use more than one color. Use a decorator tip to make the skirt as fancy as you like and decorate the top of the doll for the top of the dress also.  (I personally went very simple and used just pink, But I added pink sprinkles to give a glitter affect)
This was my best cake ever!!! And it tasted Amazing!! 

But just so you know Barbie's legs were put back on and she's back to having tea parties!